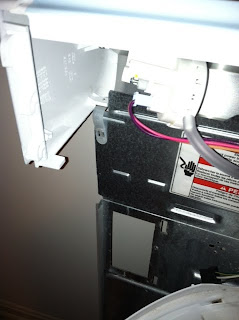
So my wife saw water in the pan under our washer on Christmas day. We were getting the house ready for our family Christmas dinner. This wasn't a lot of water but because it is on the second floor any water is a problem. So I goggled "water leak washer" and found some ideas. All required the dis-assembly of the washer. I found this youtube video which didn't seem specific enough to apply to my washer, but it turns out it was right on. Link to video of taking apart a washer: http://www.youtube.com/watch?feature=player_embedded&v=6XIsK3W_Qcg. The video covers the process but I'll hit the highlights. It only needed the removal of 2 screws to start to get the control console off the chassis. Then it is a matter of sliding the hooks shown on the left out of their slots (both sides). Next there are clips which fit in slots on the chassis and go into the slots (left one is next to the warning sticker) in the back cover.
The two clips are shown below. These need to be pried away from the chassis side.
There is a electrical connector for the lid position that needs to be disconnected. You then can swing the console out of the way and then tilt the chassis off the assembly.
At the bottom of the basin is the pump assembly. Drops of water were evident on the discharge hose. Not at the pump output but where the hose was held on the washer with a clip. I removed the hose completely and held the end and blew into the hose finding a pin hole in the hose where it was wet. Note the clamps on the other hoses. I replaced the one I removed with a screw type hose clamp as some of the information I found indicated at the OEM type of clamps fail (this I learned from my boat repair experiences).
Here is the hose in question. Its about 8 feet long and the hole was about 6 inches from the pump end.
So there was a number on the hose and after a goggle search I found the item for about $14. The funny thing was there are 3 clips that hold the hose to the washer. Two are simple but the one where it leaves the washer is pretty complicated and this actually took the most time to remove. Well at $14 I figured all I was getting would be the hose, but it was pictured with the clips on it. I also wanted to see if any local places had this item so i wouldn't have to wait, but I figured it would cost 2X as much. So I called a likely local place with a nice website: http://landersappliance.com. They had to order it but it was there the next day by noon. Oh and it was $11. No bad at all. Reassembly was pretty easy. The only complication was the drain pan made getting the chassis back on harder but I got it on. We ran a test load and no leaks so I say its fixed.


No comments:
Post a Comment