Sunday, September 8, 2013
Baltimore All-stars are now back know as the Ravens
If you recall I referred to the Ravens as the Baltimore All-Stars last season due to the fact they could turn into another team when needed as seen by the Super Bowl Victory. This season the Ravens need to prove they deserve that title again, because after that first game this year all I can say is: WTF?


Cabinet project
In the back of my basement there is a nice little corner that us under utilized from a storage perspective. I decided to build a cabinet to mount in that space. Essentially it is a wall cabinet modelled after any kitchen cabinet except bigger. This is 15" wide 20" deep and 75" tall. Why did I build this as oppossed to buying one? Well I couldnt find a suitable off the shelf cabinet that size. If they were that tall they were too wide or not as deep. The other issue is I wanted this cabinet to perserve and protect the contents from water mainly and dust. That is why I wanted real wood that I could finish and a door I could gasket. So I drew up some plans and got out the table saw and proceeded to build a cabinet.
The first issue I ran into was how to join the various sides and frame pieces together. I had planned to just nail the pieces edge to edge, but after doing some research I found the Kreg jig system (mentioned last month). I settled on a plywood base and sides and a 1x3 face frame. The door is going to be 1x3 frame with Birch panels and a Birch back panel. Once the rough cuts were made for the cabinet I set about making the door. This was a bit of a challenge since I planned to build a frame and install panels. The first pictures show the issue with that. I cut the frame members for the door then I cut a channel for the panels to pit it. The issue was I cut the channels full length thus not leaving anything to screw the frames together with. My solution was cut shims to fill the channel, then glue them in place and finally sand them to the correct height.
After overcoming that issue; I set about building the cabinet up. One key to the Kreg jig is to clamp the joints before screwing them in. Most joints regular clamps work, although I had to buy 36" ones. I ordered the corner clamp/vice you see in the picture holding the base or top in place as it gets screwed in. This was a Kreg product (ordered from Amazon). It worked well for the outside corners. As you can see in the next set of pictures I got it all together. The next step was the hardest which was sanding. I wanted the surface pretty nice to accept the finishing. This took a lot of work, which I question the amount I put into it and my choice in materials. The ply wood portions were the worst and since it was not finish grade took a bunch of effort to make it even close to smooth. I shouldn't say that, close to not splintery if I am honest. Once done, I took it into the garage for finishing. The choice for finishing was tough. As it wasn't intended to be a piece of furniture on display it wouldn't seem critical, but I wanted to protect the wood. There had been a minor dishwasher leak a few years ago and the area where I placed the cabinet got dripped on and I wanted some protection in case another water issue may happen. After some research I settled on a light color stain followed by polyurethane. Must parts took 2 coats of stain to cover well. The poly step I figured I didn't want to go overboard again just enough to protect not make a museum piece. I got the wipe on type. This seem to build up at all, it seemed to just soak in to the wood so I was using way too much. In the end Brush on poly was the way to go. I left the wipe on the interior but I went back and covered all the surfaces with brush on, which went on great (probably because there was so much wipe on under it?). A few lessons were learned during this (some are outlined in the comments in the process tree). The biggest is a random orbit sander, even with 220 grit will tear right through your finish. You have to start and stop the sander in contact with the wood. Setting the sander on it while spinning will not work. Here is the task list for the finishing steps and the pictures in the garage show the various states of the process.
Rough sand all pieces 80 grit (I found out this is not needed on finish grade portions ie 1x materials)
Light sand outer 180 grit
Vacuum Wipe with tack cloth (found out air would work better to remove dust)
Make shelves/supports finish
Make back
Stain
Wait 4-6 hours
Stain
Poly
Fine sand 220 grit between coats (caution is needed here...)
2-3 hours
Poly
Almost done. Took the cabinet to the basement to install. First I caulked the seems and nailed the back cover in place. The the mounting then commenced. I built a base frame in place to rest the cabinet on (8" off the floor) for mounting. This corner where it's going gives the ability to screw into 2 studs on the right side and 1 stud on the back. I set the cabinet on the frame and used a finish nailer hold it in place for me to drill the mounting holes through the cabinet and into the studs. I then bolted it up using 1/4" lag like bolts. A few more things to do. The door got hinges attached then the door was mounted. The 2 shelves were mounted using wood mounting brackets. Next the latch was put on. It is an outdoor gate latch which had to have it's receiving bracket modified to fit the frame, but it is working well. Last major step was to put on a gasket that ran around the door jam (this is working very well as indicated by the amount of finishing fumes smelled when opened, these had dissipated from the exterior in a week). One more thing the final touch was a motion activated LED light to light up the interior. The final fitting out of the cabinet I am leave out as it is an on going process specific to the contents to be housed there in.
All in all this was a very satisfying process. I enjoyed the design and using the Kreg jig to build the cabinet up. The biggest take away is if you are going to finish a project start with quality wood. I spent more than a few weekends on this one, but taking my time and having patience leads to better results every time.


August Boating Trip to The Harbor

Took a little Cruise to the Harbor to hit a restaurant for my sister's Birthday. It was a rare thing that my boat left the dock and fishing wasn't involved. The cruise took about how long I expected about an hour and it was a weekend so we had to slow down in the no wake zones.
Had this nice sunset as we came back in to Middle River:


Friday, August 16, 2013
Life Below Zero
My new favorite show. A little girl just said:
"We're going to net rabbits and then club them"
with a smile on her face...
Now I'm no PETA member but that seems a bit cruel. Another thing I don't like is trapping, that the one guy does. It seems a bit cruel too. I wouldn't mind if that dude had an accident with a trap, just so he would stop.
Other than those two issues; seeing the people being self reliant and living somewhat off the land is pretty cool. I would like to visit Alaska one day to experience a taste of that life.
Update:
The kid's mom just said:
"Hit them as many times as you can until their dead. O.K. princess?"
I'm glad we are here and they are in Alaska...
"We're going to net rabbits and then club them"
with a smile on her face...
Now I'm no PETA member but that seems a bit cruel. Another thing I don't like is trapping, that the one guy does. It seems a bit cruel too. I wouldn't mind if that dude had an accident with a trap, just so he would stop.
Other than those two issues; seeing the people being self reliant and living somewhat off the land is pretty cool. I would like to visit Alaska one day to experience a taste of that life.
Update:
The kid's mom just said:
"Hit them as many times as you can until their dead. O.K. princess?"
I'm glad we are here and they are in Alaska...
Monday, August 5, 2013
DIY Projects
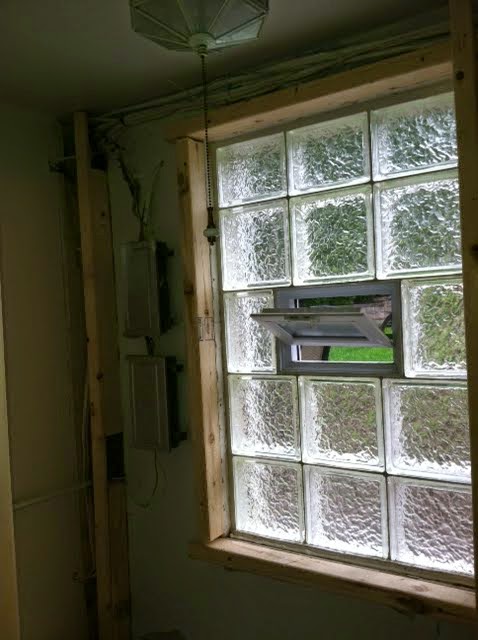
The end of July/beginning of August found me doing a few projects. First I was helping a friend finish his bathroom. The picture below is studding out from the wall. Then I hung drywall and applied a tape coat. This was fun as I got to use my powder actuated nail driver and nail gun.
The second project is building a long wall cabinet in my shop area. It is going to be 15" wide by 20" deep and 74" tall. I looked for something off-the-shelf, but the narrowest cabinets I found weren't wide or tall enough. My design was going to be nailed together until I found reference to a Kreg Jig http://www.kregtool.com/pocket-hole-jigs-prodlist.html. They had a video of how to build a wall mount cabinet that was good for reference even without the Kreg jig. That project video actual sold me and to my surprise my Home Depot had it in stock. I bought it and a bunch of wood. So off I went cutting the wood and planning the build. Stay tuned for pictures.
Evening Beach Stroll


This weekend I went to spend sometime with my parents on their vacation to Ocean City . Thursday night we went for a walk as the sun was setting and saw this beautiful sky. This orange glow behind the clouds was odd in that the view was to the east and the sun was setting on the other side of the sky. Either direction it made for a nice scene.
A Childhood mystery solved
So when I was young 7 or 8, my grandfather let my family borrow a few fishing rods for use on vacation. The day we went to get them from their house, he rigged a weight up to a line and showed us how to cast in the backyard. When he was done he took the two piece rods apart. Then something happened that stuck with me to this day. He took his finger and wiped it against his nose and then wiped the oil onto the smaller rod connection.

For years this puzzled me and struck me as odd. The truth is I always followed his example and did it more out of respect for the memory than for the practical utility of the action. That is until I read this article that talks about the unique properties of Nasal Sebum (my former pop-pop nose oil).
http://en.wikipedia.org/wiki/Nasal_sebum
For years this puzzled me and struck me as odd. The truth is I always followed his example and did it more out of respect for the memory than for the practical utility of the action. That is until I read this article that talks about the unique properties of Nasal Sebum (my former pop-pop nose oil).
http://en.wikipedia.org/wiki/Nasal_sebum
Subscribe to:
Posts (Atom)